Per tal de crear una presentació Google d'unes fotos amb un text concret a cada foto, amb un mínim de temps rècord, procedirem:
Creem una presentació de Google Slides
Creem una carpeta exclusiva d'imatges als Google Drive
Obrim un Script dins de Google Slides (Extensions > App Scripts)
A l'editor de l'Scripts hi enganxarem el programa adjunt més avall. Encara que abans caldrà modificar-lo en els punts marcats en taronja, groc i verd.
El valor ID de la presentació i de l'ID de la carpeta el llegim i copiem del browser.
Per a la presentació el trobem:
just després de https://docs.google.com/presentation/d/...
i just abans de .../edit
Per a la carpeta és a partir de
https://drive.google.com/drive/u/0/folders/...
Finalment, els títols que van a cada diapositiva, els anotem dins mateix del programa:
sempre entre cometes "títol"
i acabat amb un coma "títol que sigui",
l'últim títol no porta coma "titol últim"
Nota important: els valors escrits entre parèntesi (1366 i 768) setWidth(1366).setHeight(768) corresponen als píxels de la imatge. Els podem conèixer fent botó dret sobre la imatge de qualsevol dels fitxers de la carpeta. Per anar bé, tots haurien de tenir el mateix tamany, si no, haurem de modificar-los un cop obtinguem el google Slides confeccionat.
We are using GET.CELL to return more information about the worksheet setting than is achievable with the CELL function. We don’t need any VBA code here to implement this.
The Basic Syntax:
=GET.CELL(type_num, reference)
type_num is a number that specifies what type of cell information you want.
The following list shows the possible values of type_num and the corresponding results.
One problem is that you cannot use the GET.CELL directly in the worksheet.
The steps are as stated below:
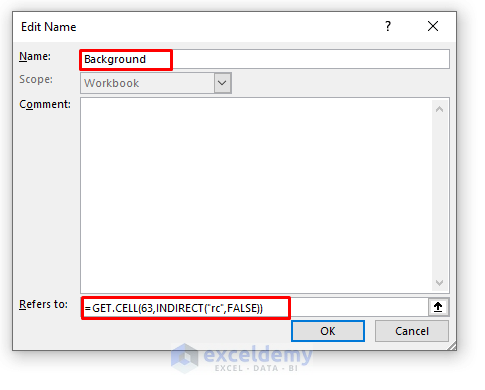
1. Go to Formulas >Name Manager. A Name Manager dialog box will appear.
2. Then, click on New.
3. Give it any name.
4. In the Refers to box, type the following format:
=GET.CELL(63,INDIRECT("rc",FALSE))
As we are working with background colors, we are using 63 in the type_num argument.
5. Finally, click Ok.
Now, you can use the GET.CELL with the name that you have given.
with open('C:/Users/JF/Desktop/llistaNoms.txt','r',encoding='utf-8') as f: my_list = list(f)
for i in range(len(my_list)-1): for j in range(i+1,len(my_list)): Str1=(my_list[i]) Str2=(my_list[j]) Ratio = fuzz.ratio(Str1.lower(),Str2.lower()) Partial_Ratio = fuzz.partial_ratio(Str1.lower(),Str2.lower()) Token_Sort_Ratio = fuzz.token_sort_ratio(Str1,Str2) Token_Set_Ratio = fuzz.token_set_ratio(Str1,Str2)
if (Ratio>80)|(Partial_Ratio>80)|(Token_Sort_Ratio>80)|(Token_Set_Ratio>80): print(i+1,j+1, Ratio, Partial_Ratio,Token_Sort_Ratio,Token_Set_Ratio)
For fCol1 = 1 To CantFilaCol1 Step 1 For fCol2 = 1 To CantFilaCol2 Step 1 Cells(m, 1).Value = Cells(fCol1, 1).Value & " " & Cells(fCol2, 2).Value m = m + 1 Next fCol2 Next fCol1
Volem anotar textos al vídeo. Són frases curtes que volem sobreescriure al vídeo.
Utilitzem el programa OpenShot Video. Allà podem descarregar els textos en format SVG.
Per tal d'agilitzar la creació dels textos, automatitzem el procés amb Processing. El programa desa els frames.
El fitxer list.txt conté el text que volem que aparegui. És una matriu amb frases. El processing crearà tantes imatges SVG com linies que contingui el fitxer list.txt .
For f = 1 To CantFila Step 1 For c = 1 To CantCol Step 1
If (Left(Cells(f, c).Value, 3) = Ultim) Then Debug.Print (Left(Cells(f, c).Value, 3)) a = Cells(f, c).Value Cells(m, n).Value = a n = n + 1 Ultim = Left(Cells(f, c).Value, 3)
ElseIf ((Left(Cells(f, c).Value, 3) <> Ultim) And Left(Cells(f, c).Value, 3) = "") Then f = f + 1 c = 1
If (Left(Cells(f, c).Value, 3) = Ultim) Then a = Cells(f, c).Value Cells(m, n).Value = a n = n + 1 Ultim = Left(Cells(f, c).Value, 3) End If
Else
m = m + 1 n = 1 a = Cells(f, c).Value Cells(m, n).Value = a Ultim = Left(Cells(f, c).Value, 3)
No es para nada agradable que el botón de encendido de nuestro dispositivo móvil no funcione, especialmente porque es fundamental para bloquear y desbloquear la pantalla. Sin embargo, los dispositivos de Apple cuentan con una opción bastante interesante para bloquear un iPhone o iPad si el botón de encendido está roto.
Estamos hablando de una función de accesibilidad llamada AssistiveTouch que nos permite simular movimientos, gestos y pulsaciones de botones con opciones de menú en la pantalla táctil. Esto es ideal porque en caso de tener el botón de encendido roto. Podemos apagar la pantalla del iPhone sin ninguna clase de problema.
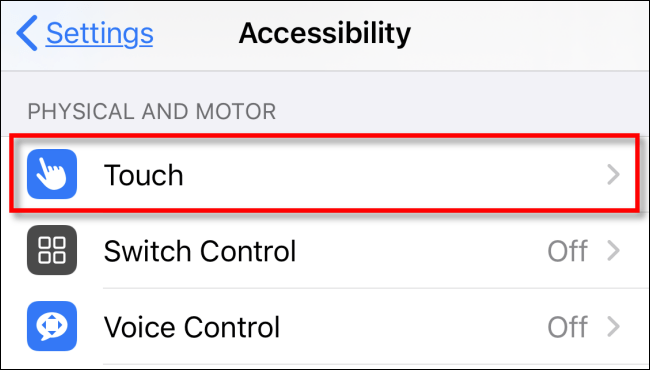
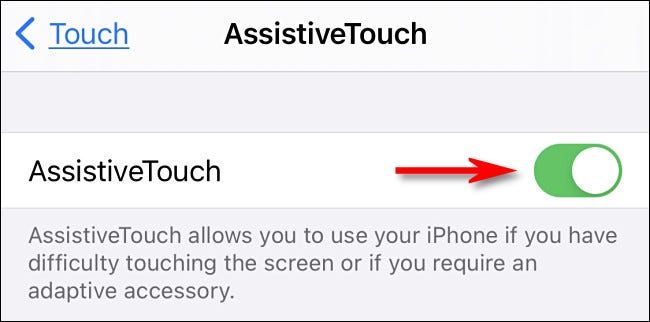
Cómo bloquear iPhone con botón de encendido roto
Lo primero que deberemos hacer es dirigirnos a Configuración y luego tendremos que ir a Accesibilidad > Touch.
Cómo bloquear iPhone con botón de encendido roto
Lo primero que deberemos hacer es dirigirnos a Configuración y luego tendremos que ir a Accesibilidad > Touch.
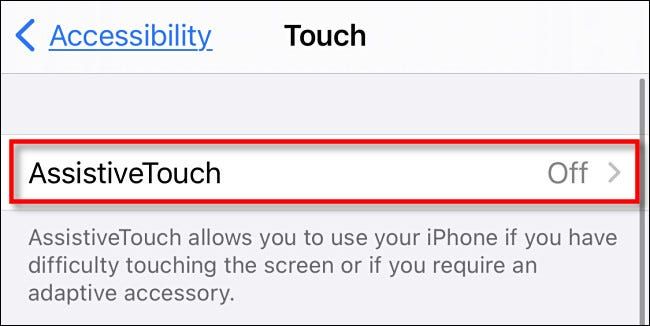
Ahora vamos a tener que pulsar en “AssistiveTouch”.
En esta nueva pantalla, tendremos que encender el interruptor que se encuentra junto a “AssistiveTouch”.
Ahora podremos ver que aparece un botón gris que tiene un círculo blanco en el medio. Aparecerá en un costado de la pantalla. Así es como logramos activar AssistiveTouch en iPhone.
ColorIndex property - 56 colours, and VBA ColorConstants
RGB and decimal color values, plus conversion
Color property
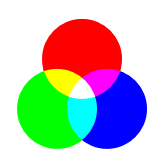
The RGB color model adds combinations of Red, Green, and Blue to produce various colours. Each component is an integer value 0 to 255. The RGB colors with intersection overlap is demonstrated in figure 1.
1. RGB colors
1.1 RGB circles with additive colour mixing
Three RGB circles with colour mixing - returns 7 colors.
Fig 1: - three circles; Red, Green, and Blue (RGB), with 4 intersection points
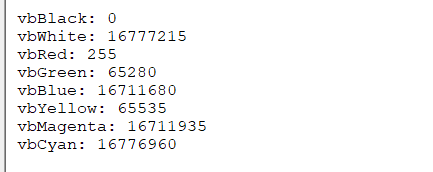
With the inclusion of black (no colour), the eight colours are:
Black: RGB(0,0,0)
White: RGB(255,255,255)
Red: RGB(255,0,0)
Green: RGB(0,255,0)
Blue: RGB(0,0,255)
Yellow: RGB(255,255,0)
Magenta: RGB(255,0,255)
Cyan: RGB(0,255,255)
1.2 RGB circles - production code
Using web browser CSS and Scalable Vector Graphics (SVG)
Code for CSS style and Scalable Vector Graphics (SVG) used to produce the RGB circles in figure 1
where value is an element from the integer series 1,2, …, 56. Special values include xlColorIndexAutomatic (-4105) and xlColorIndexNone (-4142).
Examples of the ColorIndex property:
xlRange.Value = "excel"
xlRange.Interior.ColorIndex = 48
xlRange.Font.ColorIndex = 20
xlRange.Borders.ColorIndex = 3
xlRange.Characters(1, 2).Font.ColorIndex = 6
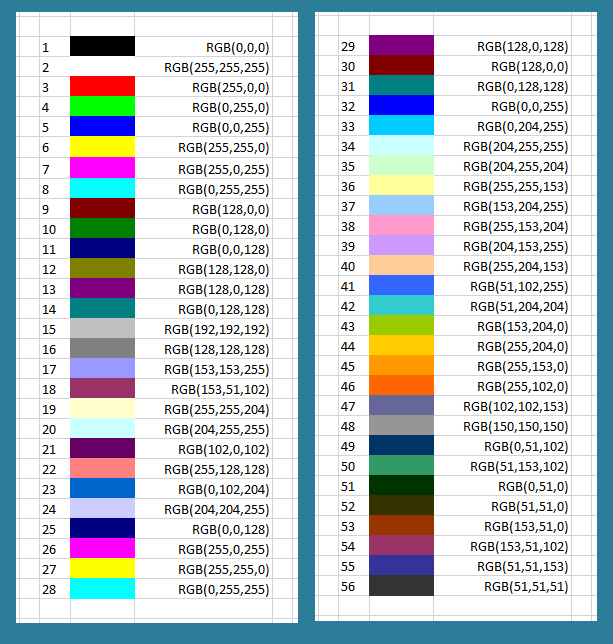
2.1 The 56 colours of ColorIndex
Colours 2 to 8 are red, green, and blue with additive mixing. The colours 9 to 56 are various combinations of red, green and blue with RGB values: 0, 51, 102, 128, 150, 153, 192, 204, and 255 (figure 2).
Fig 2: ColorIndex - numbers, colours, and RGB values from code 1
The WS range in figure 2 was printed from the ColIndx2wWS procedure in code 1.
Code 1: Sub ColIndx2WS procedure prints ColorIndex to WS (see figure 2)
Ten of the ColorIndex colours are duplicate pairs: Blue 5 and 32 ; Yellow 6 and 27 ; Pink 7 and 26 ; Turquoise 8 and 28 ; Dark Red 9 and 30 ; Dark Blue 11 and 25 ; Violet 13 and 29 ; Teal 14 and 31 ; [No name] 18 and 54 ; and [No name] 20 and 34 . Leaving only 46 unique colours.
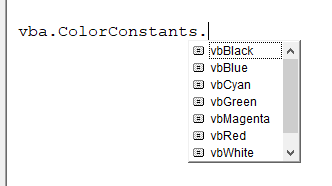
2.2 ColorConstants
The 8 colours listed in section 1.1 have name equivalents listed as members of the VBA ColorConstants class in the decimal colour system. The ColorConstants Auto List drop down is shown in figure 4.
Fig 4: VBA ColorConstants - VBA Auto List drop down with 8 items
Code 3 prints a list of the ColorConstants numerical values to the immediate window (figure 5).
The immediate window with output from line 69Fig 5: VBA ColorConstants - colors 1 to 8
3. Decimal values of colours
3.1 RGB to positive decimal
To convert RGB to decimal , the relationship is Cd=R∗2560+(G∗2561)+(B∗2562). See code 4.
Code 4: Function xlfRGB2DecX converts RGB values to decimal. Includes test routine
75
76
77
78
79
80
81
82
83
84
85
86
87
88
FunctionxlfRGB2DecX(Red AsInteger, Green AsInteger, Blue AsInteger) AsLong
xlfRGB2DecX = Red * 256 ^ 0 + Green * 256 ^ 1 + Blue * 256 ^ 2
EndFunction
' ===========================
FunctionxlfRGB2DecY(Red AsInteger, Green AsInteger, Blue AsInteger) AsLong
xlfRGB2DecY = RGB(Red, Green, Blue)
EndFunction
' ===========================
SubTestxlfRGB2DecX()
DimAns AsLong
Ans = xlfRGB2DecX(204, 255, 255)
EndSub
3.2 RGB to negative decimal
To convert RGB to Excel negative decimal, the relationship is C−d=RGB−(2563)−1
The color red is RGB(255,0,0), equal to 256 as a positive value. The Excel negative value equivalent is RGB - (256^3) - 1= 256 - (256^3) - 1 = -16776961
3.3 Decimal to RGB
The backslash operator "\" divides two numbers and returns the integer quotient. The remainder is ignored.
Code 5: Function xlfDec2RGB converts color decimal to RGB comma separated values. Includes test routine
Line 95:16737843 And 255 returns 51, 51 \ 1 returns 51, remainder 0 Further details of the binary And are provided in figure 5. Only the last 8 digits on the right are relevant.
16737843 = 111111110110011000110011;
255 = 11111111;
AND returns 00110011 = 51
Fig 5: binary AND - last 8 digits on the right
Line 97:16737843 And 65280 returns 26112, 26112 \ 256 returns 102, remainder 0
Line 100:16737843 \ 65536 returns 255, remainder 2616
4. Color property
Syntax: expression.Color = value
where value can be created by the RGB function returned as a long whole number.
Examples of the Color property:
xlRange.Value = "excel"
xlRange.Interior.Color = RGB(150,150,150) (equivalent to ColorIndex 48)
xlRange.Font.Color = 16777164 (equivalent to: RGB(204,255,255); ColorIndex 48)
xlRange.Borders.Color = RGB(150,0,0) (equivalent to ColorIndex 3)
xlRange.Characters(1, 2).Font.Color = 6 (equivalent to: RGB(6,0,0))